Bootstrap JavaScript Components

Bootstrap JavaScript Components
By Syed Fazle Rahman
Bootstrap happens to be the easiest and the best CSS framework on the Internet today. It allows developers with no CSS knowledge to build basic templates without any efforts. But this doesn't stop designers from using Bootstrap. Bootstrap has one of the best sets of powerful JavaScript components. These components are easy to use and are usable in your web project, today. Here I will discuss some of the best Bootstrap JavaScript components and how to use them.
Let's get started!
The first thing that we should understand is that Bootstrap’s JavaScript components are written in jQuery. So we need jQuery to work with them. After you have downloaded Bootstrap 3, copy the contents of the dist folder and paste it inside a new work-space. You must be thinking why do we need the CSS and fonts folder when we are going to learn JavaScript? There are many Bootstrap JavaScript components that depends on CSS to work properly.
So unless you include the Bootstrap CSS it won’t function properly. Bootstrap 3 also allows us to use each module individually instead of downloading all the JavaScript components. We will see at the end of this tutorial how to use a single module instead of including all the components. Some of the main Bootstrap JavaScript components explained in this tutorial are:
Modal
Dropdown
ScrollSpy
Tab
Tooltip
Popover
Alert
We will cover each of them in this tutorial. We will also experiment a bit with each component so that we get a customized Bootstrap 3 JavaScript component.
Modal
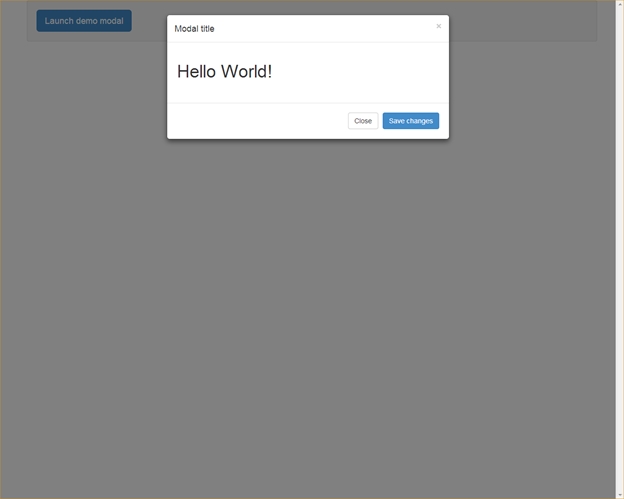
A modal is a dialog prompt just like a traditional alert. It comes with advanced features like modal title, modal body, modal footer, close button and a close symbol at the top right corner. It can be used as a confirmation window in many applications such as before making a payment, or deleting an account, etc. A Modal has three sections: header, body and footer. You can decide what to place in each of them.

DropDown
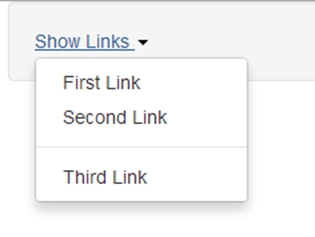
Creating a drop down menu in Bootstrap 3 gets extremely easy. You just have to understand right markup required. You can use this DropDown in a navigation bar or inside any div you wish.

First, you have to give the class "dropdown" to any parent element that you want to treat as a drop down element. In my case, I have used a div element. You can even make an li element as "dropdown". Then you have to place an <a> tag immediately inside the dropdown element. Add a new attribute "data-toggle" to the link tag and give the value as "dropdown". Finally add a ul list below the link tag. You have to add class as "dropdown-menu" to the ul tag. To add a separator between li elements, add a new emplty li element with class as "divider" to the list. if you are not comfortable with the data-* attributes then you can even trigger drop down using jQuery. Give a unique id to the link element and call the dropdown method as below:
ScrollSpy
ScrollSpy is an interesting JavaScript module added to the Bootstrap library. It is basically a combination of navigation menu and contents below. Its role is to update the active item in the navigation bar as you scroll down the content area. To use the ScrollSpy feature you have to add data-spy="scroll" and data-target="#top-navigation" attribute to the body element. Here #top-navigation is the id of my navigation bar. Make sure the links in the navigation bar are internal links.

Tabs
Bootstrap 3’s tabs take inspiration from traditional jQuery tabs. They both look and function alike. To use Bootstrap Tabs you need to define two separate sections: the tabs navigation and tab areas. The markup goes like below:
The navigation is created using a ul element with the class “nav-tabs” while the additional class nav is used to apply the navigation CSS style. Each li element is composed of an internal link that should define the attribute data-toggle as “tab”. This triggers Bootstrap’s Tabs JavaScript and the respective tab area is displayed. Coming to the tabs area, it consists of a set of div elements. The parent div should have a class as tab-content and the child divs should have a class tab-pane. Each tab-pane must have an id corresponding to the internal links defined in the tabs navigation. In the above example, I have set a class of the first tab-pane as active. This makes it visible by default.
ToolTip
ToolTip is an extremely useful JavaScript plugin provided by Bootstrap 3. It helps in showing help texts on any HTML element. It's cross-browser compatible, too! To use ToolTip, the markup goes like this:
The above markup displays a button with the tooltip feature. Attribute data-toggle is used by Bootstrap to identify on which element it has to display the tooltip. Attribute data-original is used to define what goes inside the tooltip. Attribute data-placement is used to help bootstrap where to show the tooltip. For performance reasons, Bootstrap will not initialize the ToolTip and Popover components by default. You have to initialize them manually by using the following jQuery:
Popovers
If you have ever been a hardcore iBook reader, then you would understand what popovers are. They are the extended version of ToolTip with some more functionalities. You can display more HTML elements like img tags, links, additional divs, etc inside Popovers.
The HTML snippet displays a button with popover functionality. It also has set of custom data-* attributes that you must necessarily understand. Attribute data-toggle identifies which element must control the popover. Attribute data-content contains the data that should be displayed inside the popover. Attribute data-placement tells on which side should the popover appear. In the above case, the data must be plain text only. If you want to display HTML content inside the popover, then you have to add the additional attribute data-html as true. The HTML data-content must go inside the double quotes with escaped characters wherever necessary. The markup for the HTML data contents inside the popover should be like below:
Use the below jQuery to initialize popovers:
Alerts
Alerts in Bootstrap are not like window popups. They are a set of divs with predefined background colors and a dismiss button. The markup goes like below:
The above alert has a pale yellow background, since it is a warning message. You can change the color to red by changing the class of the alert to alert-danger. Every alert div must have a close button with a set of data-* attributes as defined above. Attribute data-dismiss hides the alert div when clicked.
Conclusion
You might now have a better understanding of how Bootstrap helps us using JavaScript components without writing a single line of jQuery in our code. These JavaScript components are one of the main reasons why the Bootstrap framework is so popular in the web today.
Last updated
Was this helpful?